The original content (and all the images) for this post were borrowed from RatExcel blog. Credits go for him, this is just a shortened version that comprises WinRAR/7-Zip methodologies with the necessary steps.
It’s complex and discouraging to go through the process to install an XLA add-in, and with any update the process will have to be repeated. Packing the files into Self-extracting archives (SFX) totally helps, as all it takes is just one double-click and the add-in will be automatically extracted to the proper directory.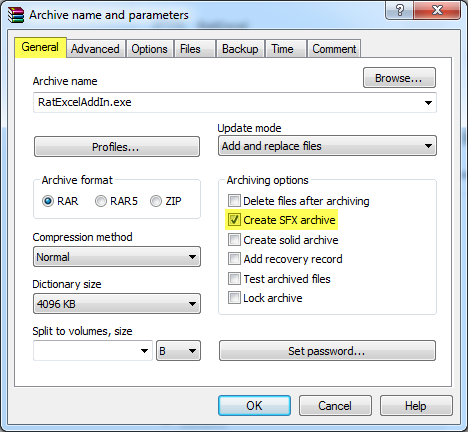 Go to Advanced tab and click on “SFX options…” button.
 Advanced SFX options window will pop up. On General tab provide the path where you want your file(s) to be extracted. You can use one of common folder variables e.g. “%APPDATA%” to access AppData folder valid for given user.
If you want your add-in to be visible on Excel Add-ins list you have to place it in the AddIns location (look in your PC for C:\Users\%USERNAME%\AppData\Roaming\Microsoft\AddIns\, changing USERNAME variable with your propper username):
Advanced SFX options window will pop up. On General tab provide the path where you want your file(s) to be extracted. You can use one of common folder variables e.g. “%APPDATA%” to access AppData folder valid for given user.
If you want your add-in to be visible on Excel Add-ins list you have to place it in the AddIns location (look in your PC for C:\Users\%USERNAME%\AppData\Roaming\Microsoft\AddIns\, changing USERNAME variable with your propper username):
 On Modes tab you can select “Hide all” option if you want the whole process to take place in the background (silent mode).
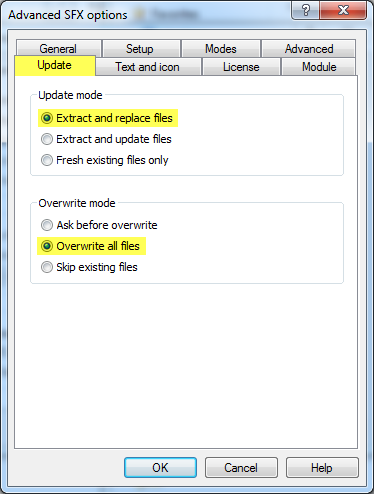
 On Update tab you are able to choose the Update mode – “Extract and replace files” and Overwrite mode – “Overwrite all files” in my case.
 There are several additional options like:
It’s complex and discouraging to go through the process to install an XLA add-in, and with any update the process will have to be repeated. Packing the files into Self-extracting archives (SFX) totally helps, as all it takes is just one double-click and the add-in will be automatically extracted to the proper directory.
SFX method for WinRAR
Right-click on the file(s) you want to add to SFX archive and choose “Add to archive…” option. Archive name and parameters window should pop up – on the General tab check “Create SFX archive”.
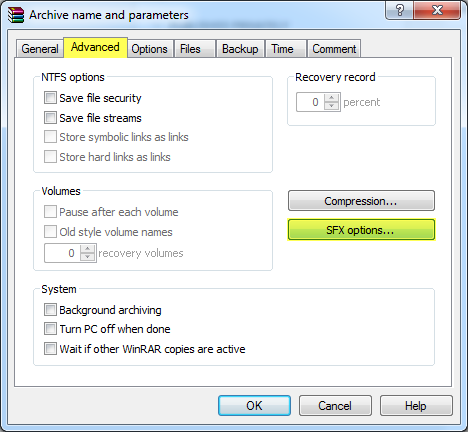
Go to Advanced tab and click on “SFX options…” button.
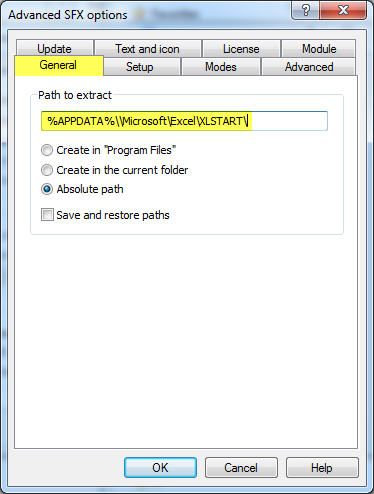
Advanced SFX options window will pop up. On General tab provide the path where you want your file(s) to be extracted. You can use one of common folder variables e.g. “%APPDATA%” to access AppData folder valid for given user.
If you want your add-in to be visible on Excel Add-ins list you have to place it in the AddIns location (look in your PC for C:\Users\%USERNAME%\AppData\Roaming\Microsoft\AddIns\, changing USERNAME variable with your propper username):
%APPDATA%\Microsoft\AddIns\If you want your add-in to start automatically each time you open Excel but you don’t want it to be visible on Excel Add-ins list you have to place it in XLSTART folder (C:\Users\%USERNAME%\AppData\Roaming\Microsoft\Excel\XLSTART\, again, you have to change username):
%APPDATA%\Microsoft\Excel\XLSTART\
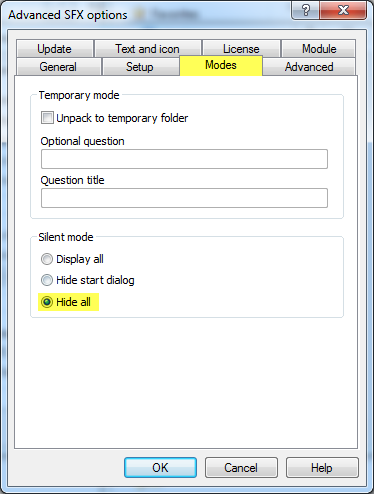
On Modes tab you can select “Hide all” option if you want the whole process to take place in the background (silent mode).
On Update tab you are able to choose the Update mode – “Extract and replace files” and Overwrite mode – “Overwrite all files” in my case.
There are several additional options like:
- Running scripts before or after execution (Setup tab)
- Deleting files in the destination folder and creating shortcuts (Advanced tab)
- Setting title and text to display in SFX window & changing SFX logo and icon (Text and icon tab) – changes visible only when “Display all” mode is selected on Modes tab
- Setting title and text of the license (License tab)
SFX method for WinZip/7-Zip
Not as easy as with WinRAR. First of all, we have to compress your add-in to “.7z” archive and put it in new folder. Next step is to download and extract 7zsd.sfx file – modified module for 7-Zip created by Oleg Scherbakov. Take 7zsd.sfx and put it in the same folder as your zipped add-in. Also in the same folder create new “config.txt” file containing the below code:;!@Install@!UTF-8! Title="RatExcelAddIn" InstallPath="%APPDATA%\\Microsoft\\Excel\\XLSTART" FinishMessage="Add-In installed/updated successfully!" GUIMode="1" SelfDelete="0" ;!@InstallEnd@!Or replace “%APPDATA%\\Microsoft\\Excel\\XLSTART” with “%APPDATA%\\Microsoft\\AddIns” if you want your add-in to be visible on Excel Add-ins list and leave the decision to switch it on/off to user. You can also change “Title” and “FinishMessage” parameters to any other text you want. If you set “GUIMode” to 2 then the whole process will take place in the background and you won’t see the finish message and if you set “SelfDelete” to 1 the file will be deleted after the execution. We want to see the finish message and we don’t want to delete the file so we leave the parameters as they are. You can find more information on possibilities 7zsd.sfx may give you here, here, here and here. There are also some usage examples here and manual on how to change SFX icon here. Then also in the same folder create another text file called “compile.txt” containing the below code:
copy /b 7zsd.sfx + config.txt + RatExcelAddIn.7z RatExcelAddIn.exeCaution: Remember to set text file encoding to UTF-8 when saving the file! Also make sure that “.7z” file name is exactly the same as your zipped add-in name and provide the name of the SFX “.exe” file you want as a result. I like to keep it simple and gave it the same name as the name of the archive. Then save the file and change its extension from “.txt” to “.bat”. You should have four files in your folder:
RatExcelAddIn.7z 7zsd.sfx config.txt compile.batNow double-click on “compile.bat”. “RatExcelAddIn.exe” file should be created in your folder. This file when executed will extract your add-in to the “InstallPath” you’ve provided in “config.txt” file. “%APPDATA%” will be replaced with AppData folder path valid for given user. Next time if you make any changes to your add-in just place its updated version in the folder, zip it to “.7z” archive, run “compile.bat” file and you will have new updated self-extracting archive created.